Monthly Archives: January 2026

Dill, Delicious Dill

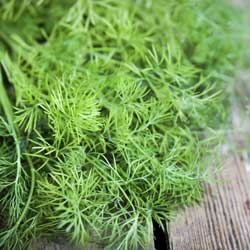
Have you enjoyed dill? An often overlooked herb, dill deserves much more attention in both the garden and the kitchen than it normally receives.

Growing Dill

This cool season plant is best when planted in very early spring or in late fall. Dill does best when planted from seed, because it doesn’t transplant well. Simply scatter seeds in a container on the patio or in the garden in early spring. Dill plants grow best in full sun. Other than this, dill will grow happily in both poor and rich soil or in damp or dry conditions, making it easy to add to any garden. One of the benefits of growing dill is that both the leaves and seeds of dill weed plants are edible.

When the daytime temperatures reach the mid to upper 60s, your dill will bolt, meaning it will put up seed shoots and go to seed. There is not much you can do to prevent this because the plant wants to set seed for the next season. Gather the ripened, dry seed for use later, or scatter the seeds immediately on the soil for another crop. Often you will get a crop in late summer that lasts through the first hard freeze, when the plant finally dies.

Dill is an annual, although the scattered seed will produce new plants the next season. Dill weed, or the leaves of the dill plant, are also easy to harvest and dry so you don’t have to go without dill in winter. Simply cut leaves and lay them on newspapers indoors, out of sunlight. In about a week the dill will be dried and you can put it in an airtight container to use later.

Dill Seasoning Tips

  • Dill seeds have a strong flavor, so use sparingly and taste often to balance the flavor to your preferences.
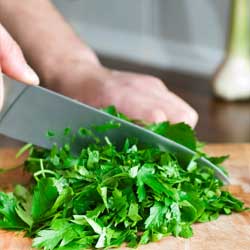
  • Dill leaves can be dried or frozen. Cut off leaves with scissors as needed.
  • Dill can be frozen in small plastic bags for up to 6 months. Use what you need and keep the rest frozen until later.
  • One tablespoon chopped fresh dill equals 1 teaspoon dried dill weed.
  • One half ounce fresh dill equals about one half cup of leaves.

Dill Recipes to Try

Dill can easily be used in marinades and rubs, and it can season soups, stews and even breads or crackers. If you want to extend your dill palate a bit further, try these delicious recipes!

Dill Dip (24 servings)

Ingredients:

  • 2 cups mayonnaise
  • 2 cups sour cream
  • 3 tablespoons chopped onion
  • 1 teaspoon seasoning salt
  • 3 teaspoons dried dill weed
  • 1 tablespoon white sugar

Directions:

In a medium bowl, mix together mayonnaise, sour cream, chopped onion, seasoning salt, dill weed and white sugar. Refrigerate for at least 8 hours before serving.

Garlic Dill New Potatoes (5 servings)

Ingredients:

  • 8 medium red potatoes, cubed
  • 3 tablespoons butter, melted
  • 1 tablespoon chopped fresh dill
  • 2 teaspoons minced garlic
  • 1/4 teaspoon salt

Directions:

Place the potatoes in a steamer basket, and set in a pan over an inch of boiling water. Cover and steam for about 10 minutes, until potatoes are tender but not mushy.

In a small bowl, stir together the butter, dill, garlic and salt. Transfer the potatoes to a serving bowl and pour the seasoned butter over them. Toss gently until they are well-coated. Serve immediately.

Once you taste dill, you’ll be curious to include it in many of your favorite recipes. Get planting and grow your own dill today!

delicious-dill

Size Up Your Site: A First Step in Planning Your Landscape

Whether you plan your garden from start to finish or use a professional designer, a few simple steps can help you assess your property’s potential to develop the landscape of your dreams. By getting involved in the landscape design process, you can address practical problems, structure your outdoor living space and develop a plan that will reflect your taste and lifestyle.

Surveying Your Site

Every yard, garden and landscape site will have differing light conditions, grade changes, varying soil conditions and existing plants and structures to consider when planning changes and expansions. Using a loose-leaf binder, take notes on each of the following:

Overall:

  1. What are your favorite spots in your yard and why? What your least favorite and why?
  2. In landscapes, do you generally prefer open on enclosed spaces?
  3. What existing plants do you want to preserve, and which do you want to remove?
  4. What is the architectural style of your home? What is your decorating style?
  5. Are you planning any additions to your home that may take away yard space?
  6. Do you want special areas for children, entertaining, pets, recreation, vegetable gardening, water features or composting?
  7. What is your time frame? Do you want a short-term or long-range plan?
  8. Which building materials do you like – brick, wood, stone, pavers, etc.?
  9. Is your outdoor lighting adequate for your use?
  10. Do you need to screen an area for wind, noise or an unwanted view?
  11. What is you landscaping budget (both short- and long-term)?
  12. How will your landscape use change over time, such as when children grow up?

Specific Areas:

  1. What is the light condition of the area? How does it change seasonally?
  2. How is the soil – well-drained, poor, heavy clay, poorly drained, etc?
  3. What are the dimensions of a confined area that could affect plant size?
  4. What are your favorite plants or types of plants?
  5. Would you like a garden accent or other feature in this area (trellis, arbor, sculpture, bench, pond, etc)?
  6. What is the pH and general condition of the soil?

Once you have taken adequate notes, you’ll have a much better understanding about the overall layout of your landscaping site. This can help you plan the best options without making costly or time-consuming mistakes, such as planting the wrong tree that will outgrow a corner in a few years, or choosing building materials that won’t stand up to your climate.

More Tips for Landscape Surveying

You can never have too much information at your fingertips when you are surveying your site for landscaping changes. More techniques that can give you all the information you need include…

  • Photographing your property. Snapshots can reveal what the eye may overlook, and can be useful to show others to get their unique perspectives. Take views from your house and various areas of your property. Include photos from different times of day.
  • Measure everything and mark it on a map. You can use graph paper to create a simple sketch that will show dimensions so you can properly size your landscaping plans.
  • Make a sketch that shows what is existing (plants & structures) and where it is located. This will help you figure out what features you want to preserve, what you may want to expand and what you would rather remove and how the space will change.

Still need help? Bring your information in – we can help you choose the best plants, accents and accessories suitable to your needs, style and budget for the landscape of your dreams!

size-up-your-site

Don’t Miss Out on Brunnera macrophylla ‘Jack Frost’

Are you trying to add drama and beauty to your shady spots but keep finding only bland, lackluster plants? You won’t want to overlook Brunnera macrophylla ‘Jack Frost’ with its stunning appearance and easy care.

Introducing Brunnera macrophylla

Also called Brunnera-Heartleaf and Siberian bugloss, this plant is a stunner for its delicate foliage. The broad, heart-shaped leaves of ‘Jack Frost’ are dark green with a heavily frosted metallic silver overlay. This allows only the green veining to peep through, giving the plant a crackle-like finish with a thin green border. Sprays of tiny bright blue forget-me-not like flowers burst forth in mid- to late spring, growing well above the foliage on delicate stems.

Using Jack Frost in the Landscape

Excellent in a woodland garden, the genus Brunnera is a group of classic perennials valued as a shade tolerant ground cover. The variegated forms are slower to spread than most other species, making this cultivar ideal for smaller spaces where crowding may be a concern, such as around younger trees, in smaller beds or in borders along a shady fence, deck or pathway. This plant is fabulous as a specimen plant or may be massed to show off its phenomenal floral display. ‘Jack Frost’ would also make a wonderful addition to a shady container garden on a deep porch or covered deck. The flowers are long lasting when cut and can be lovely, delicate additions to arrangements. Because this plant is resistant to deer and rabbits, it can also be a favorite in wildlife-friendly areas.

Proper Care is Key

Brunnera is a woodland plant, and that must be kept in mind if it will be able to show off its full potential in your landscape. ‘Jack Frost’ should be grown in full shade and consistently moist soil in southern regions to mimic the thicket-like conditions it naturally favors. In the north, morning sun is acceptable as long as the soil remains moist and the temperatures in the sun do not rise too high. Although tolerant of many soil types, this plant will grow best rich soil. If needed, amend soil with lush compost to improve its condition and provide proper nourishment. Little care is needed once Brunnera is established. Cut back the old foliage in the spring rather than in the fall; it will help to protect the crown during the winter. A winter mulch is also recommended to help keep the soil moist and warmer to protect the roots.

Brunnera macrophylla ‘Jack Frost’ may not be widely known, but once you meet it, you’ll want to invite it to every shady part of your landscape!

jack-frost2

jack-frost

Feeding Birds in Winter

Winter is a crucial time for birds. As temperatures drop, there are no insects to eat and the natural seeds are covered with snow, and as the season lengthens, the berries and crab apples are long gone. Birds need enough food to maintain their body temperatures and must search for food from sun up to dusk. If you provide nutritious options at feeders, birds will flock to your yard all winter long.

Best Foods for Winter Birds

Fatty, high-calorie foods are important for winter birds. Fat is metabolized into energy much quicker and more efficiently than seeds to help them maintain their high body temperature necessary for survival.

A number of backyard foods are excellent sources of quick energy and protein to nourish winter birds, including…

  • Suet
    Suet cakes provide an excellent energy source for birds and are often mixed with seeds, berries, fruit and peanut butter to appeal to a wider range of species. These fatty cakes are easy to add to cage or mesh feeders, or suet balls, plugs, shreds and nuggets are also available.
  • Peanut Butter
    Peanut Butter is also very popular with a large number of birds. To reduce the cost of feeding peanut butter, you can melt it down and mix it with suet or mix in cornmeal so it is not quite so sticky. Smear peanut butter on pine cones and hang them for fast, easy feeders.
  • Seeds
    When native seeds may all be eaten or hidden under snow, seeds at feeders are very important. Seeds contain high levels of carbohydrates that are turned into glucose to help with the bird’s high energy demands. They also are a good source for vitamins and some protein. Make sure the seed you purchase does not have a lot of fillers (milo and wheat seeds) that are not eaten. Mixes with sunflower seeds and millet are preferred.
  • Sunflower Seeds
    If you want to offer just one seed to birds, you can’t beat sunflower seed. Black oil sunflower seeds have a softer shell than the striped seeds and can be eaten by sparrows and juncos, as well as cardinals, finches, jays and many other birds. These seeds have a number of advantages: they are not overly expensive, they appeal to a wider variety of species and they contain a larger amount of vegetable oil to help supply the energy birds need to maintain their body heat in the winter. They are also a good source of protein.
  • Cracked Corn
    Cracked Corn is a good, inexpensive food that appeals to a large number of birds, including doves, sparrows, juncos, quail and cardinals, as well as starlings and grackles. Sprinkle the corn liberally right on the ground for larger ground-feeding birds to enjoy.
  • Nyjer
    Nyjer (thistle) seeds are small, oil-rich black seeds typically offered in tube feeders or fine mesh feeders small birds can cling to as they feed. These seeds are tiny but they pack a huge punch for oil and calories, ideal for winter feeding. Nyjer is a favorite of goldfinches, pine siskins and redpolls.
  • Nuts
    Nut meats are highly nutritious and provide necessary amino acids and protein a bird’s body cannot produce. They also have oil and are high in energy. Peanuts are the most popular nuts to offer to backyard birds, but walnuts are also a good option. Avoid using any nuts that are salted or seasoned, however, as they are not healthy for birds.

Other Winter Feeding Tips

Just providing food for winter birds isn’t enough to help your feathered friends stay well-nourished during the coldest months of the year. For the best feeding…

  • Position feeders 5-10 feet away from bushes and shrubs that may conceal hungry predators.
  • Use broad baffles to keep squirrels off feeders and to shelter the feeders from snow and freezing rain.
  • Refill feeders frequently so birds do not need to search for a more reliable food source, especially right before and after storms.
  • Use multiple feeders so you can offer a wider variety of different foods and more aggressive birds cannot monopolize the feeder.
  • Provide water in a heated bird bath so thirsty birds do not have to use critical energy to melt ice and snow to drink.

Feeding birds in the backyard can be a wonderful winter activity, and if you offer the best, calorie-rich foods birds need, you’ll be amazed at home many birds come visit the buffet.

feeding-birds-winter-2

feeding-birds-winter-3

feeding-birds-winter-1

Anti-Desiccants: Why, What, and When

You’ve removed late-autumn weeds, layered on the mulch, pruned appropriately, possibly even covered or wrapped your plants – so why do some still die in the winter, despite all your well-meaning efforts?

Many plants die during winter because they dry out, or desiccate. As temperatures drop, the ground freezes and plant roots cannot take water from the soil, no matter how much snow may fall. This causes the plant to use stored water from the leaves and stems as part of the transpiration process, during which water exits the plant through the leaves. If the sun is shining or the wind is blowing, transpiration increases and more water exits the leaves. If no water is available and transpiration continues, the plant will soon die. Because evergreen plants do not drop their leaves, they are especially susceptible to this death.

Preventing Desiccation

How can you help your plants stay well-hydrated through the frozen drought of winter? The first step is to remember healthy plants in the summer survive the hardships of winter far better than sickly or stressed plants. Through the spring, summer and fall, you should always be on the lookout for signs of pests, diseases and damage, and take all necessary steps to keep your plants thriving.

Second, be sure to water well even when temperatures begin dropping below freezing. Later, if the ground thaws, water before the ground refreezes. Water slowly to provide a deep drink without waterlogging the roots, however, so they are not damaged by ice.

The third step is to use an anti-desiccant, also called an anti-transpirant, to reduce the moisture loss from the leaves and needles. Because broadleaf evergreens such as boxwood, aucuba, holly, rhododendron, many laurels, Japanese skimmia and leucothoe do not drop their leaves, they are especially vulnerable to winter death. Using a product such as Wilt-Pruf to reduce transpiration by protecting the pores will save many broadleaf evergreens.

When using any horticultural product, be sure to check the label and follow all instructions properly. Some conifers such as cedar, cypress, juniper and pine may benefit from these products. However, be sure to read the instructions to prevent burning specific conifers. Also, do not use on “waxy” blue conifers, such as blue spruce, which already have an oily protective film on the nettles.

Here are a few reminders to get the best protection from an anti-desiccant:

  • Plan to apply when day temperatures begin dropping below 50⁰ Fahrenheit. Apply when temperatures are above freezing on a dry day with no rain or snow anticipated within 24 hours. This allows the product to thoroughly dry. Spraying in freezing temperatures will cause plant damage.
  • Do not spray conifers until thoroughly dormant, generally in late winter. This prevents trapping moisture in the needles which could burst when frozen.
  • Generously apply to dry leaves and needles. Don’t forget the undersides. Spray from several angles to ensure complete coverage.
  • Because the anti-desiccant will break down in light and warmth, reapply in late winter on a dry day when temperatures are above freezing for at least 24 hours.

Beyond Winter Drought

Other than protecting your landscape evergreens from winter drought, there are other uses for anti-desiccants. Many gardeners use it to protect newly transplanted shrubs from drying winds and sunshine as they settle in. It also provides protection to tender bulbs going into storage. A quick spray in early winter protects rose canes and hydrangea stems. Spraying onto live or cut Christmas trees and carved pumpkins slows the drying process, making them last longer for greater holiday enjoyment.

To answer your questions, or to choose the best product for your landscape plants, come in to discuss anti-desiccants with one of our friendly and knowledgeable staff members. Together, we can reduce the number of plants you lose to the dryness of winter and keep your garden beautiful and healthy.

AntiDesiccant_1AntiDesiccant_2AntiDesiccant_3

Creating Humidity for Houseplant Health

Have your houseplants been looking dingy and dry no matter how much you may water them? Have they lost the lustrous glow their foliage first had when you got them? Poor humidity may be the cause. Many of our houseplants hail from the tropics and grow in humidity of 50-80 percent, considerably more humid than typical homes. The trick is to know your plant’s preferences and be able satisfy it. Putting a cactus in the shower will cause it to rot, while a fern is perfectly happy.

But what can you do if you really want that fern in the family room where the humidity may only be 20 percent in the winter? If your plant has brown leaf tips or margins it probably needs more humidity and is asking you to increase it. Luckily, it’s easier to add humidity than it is to take it away.

Easy Ways to Increase Humidity

There are several ways you can easily increase the humidity around your houseplants. If they only need the air a little more humid, just one technique may be sufficient, but if they are humidity-loving plants, you may want to try several options at once to really give them a humidity boost.

  • Pebble Tray
    Place an inch of small pebbles, marbles, shells or gravel in a 2″ deep tray, half fill the tray with water and set your plant on the pebbles. Don’t set the pot in the water, as the wicking action will saturate the pot soil and could lead to rotting roots and overwatering. As the water in the tray evaporates, it increases the humidity immediately around the plant. When you water the plant, pour out the water from the tray to prevent mineral buildup, algae and insect growth.
  • Plant Grouping
    Rather than spacing plants throughout the room, group them together to take advantage of the moisture each plant produces through transpiration. Grouping plants can increase humidity by as much as 15 percent. Place the entire group on a pebble tray if additional humidity is required. Allow air circulation between the plants by ensuring the plants are not touching each other, and rotate individual plants periodically to encourage straight growth and distribute humidity absorption.
  • Misting
    Use a misting bottle daily to increase humidity and cleanse leaf pores, which tend to clog with dust. However, to prevent leaf rot, do not mist plants with “velvety” leaves such as African violets. Do not over-mist plants to the point where their leaves are dripping wet, or else they may suffer from overwatering.
  • Humidifiers
    Available in a variety of sizes, humidifiers increase the humidity in a larger space. You may also find yourself breathing better when using a humidifier. Our houses become very dry in the winter because of furnaces, heat pumps and fireplaces, and humidifiers can not only help houseplants, but can also help alleviate dry skin, limp hair, chapped lips and hacking coughs.
  • Terrariums
    If your house is just too dry for the plants you would like to grow, try planting them in a terrarium. These nearly enclosed vessels create miniature environments perfect for humidity-loving tropical plants such as ferns, orchids and mosses. You will still need to water your terrarium, but because much of the moisture is trapped, the humidity in the enclosure is much higher.

Keeping your humidity-loving houseplants happy in the winter isn’t difficult. Come in and see us to ask questions, get answers and pick up the simple supplies to make your home a houseplant haven.

HumidityforHouseplant_1

A Kitchen Herb Garden

Fresh cut herbs are a delight for any cook, and when they are within arm’s reach, fresh herbs are a delight and dream come true! During the coldest months of the year, potted herbs not only offer convenient, fresh seasonings, but also fragrance, color and flowers to truly spice up the kitchen.

Growing Tips for a Kitchen Herb Garden

Growing herbs in your kitchen isn’t much more difficult than growing them in your garden. To make the transition and bring herbs to your kitchen year-round…

  • When transplanting, use a soil-less potting mix such as Pro-Mix (remember to pre-moisten the soil mix) to ensure proper drainage in small pots.
  • Place on a window sill that gets direct morning sun until noon. If that isn’t possible, opt for another well-lit, sunny window with at least 4-6 hours of bright light.
  • Provide adequate air circulation, but avoid a direct draft or chilling breeze. Do not overcrowd plants which would limit air circulation.
  • Keep temperatures between 60 and 70 degrees. Bear in mind that oven and stove use will heat up the immediate area in the kitchen.
  • Soil should be allowed to dry slightly between watering. Never leave herbs in soggy or wet soil, and drain excess water to prevent rot.
  • Group pots on a tray of moist pebbles for increased humidity to keep foliage (the tastiest part of the herbs!) lush.
  • Feed with a 20-20-20 fertilizer, but adjust the feeding schedule as needed for individual plants.

Choosing Kitchen Herbs

Many different herbs are actually easy to grow inside on the sill. You might choose the herbs you use most often, or those that are featured in your favorite recipes for more flavorful results. You can even consider a specialized garden, such as a salad garden with chives, small Bibb lettuce and even pansies (colorful and edible, too!). An Italian garden might include basil, garlic chives, Italian flat parsley and oregano. Customize your kitchen herb garden to any taste!

The most popular, easiest-to-grow-indoors herbs include…

  • Basil
  • Borage
  • Catnip (for your feline friend)
  • Chives
  • Lemon Balm
  • Mint (best choices include apple, wooly, Corsican, curly, orange, peppermint, pineapple, silver and spearmint)
  • Oregano
  • Parsley
  • Rosemary
  • Sage
  • Bay Laurel
  • Sweet Marjoram
  • Thyme
  • Winter Savory

No matter which herbs you choose, they’re sure to brighten not only your kitchen with their lovely foliage and aromatic fragrances, but they’ll add delectable depth of flavor to all your winter dishes, from soups and stews to roasts, marinades, breads, salads and even desserts. Enjoy those winter herbs, right in your kitchen!

kitchen-herb-2

kitchen-herb-3

kitchen-herb

Caring for Orchids

Orchids can be an amazing addition to your indoor landscape, but unfortunately they have a reputation for being finicky and difficult. While they do require precise care, if you know what their needs are, you can easily grow a variety of beautiful orchids and enjoy their exotic loveliness throughout the year. To care for orchids properly…

  • Provide Good Light
    Orchids need at least 6-8 hours of bright indirect light or morning sun. Light is the key with growing orchids – without enough proper light, an orchid may live 20 years but never rebloom.
  • Increase Humidity
    Orchids are tropical and some varieties require from 65-75 percent humidity. The plant can sit on pebbles in a water-filled tray that is kept filled up as it evaporates. Grouping orchids can also improve their collective humidity.
  • Adjust Temperature
    Ideal orchid temperatures vary depending on the type of orchid and the time of year. Warm orchids require 55-65 degrees temperatures at night with daytime warmth reaching 75-85 degrees. Cool orchids need the same night time temperatures, but only 65-75 degrees during the day.
  • Water Appropriately
    Water the plant every 5-7 days in the sink, as the growing medium has fast drainage. Smaller orchids may need watered every 3-4 days. The water should be room temperature and without any additives other than fertilizer.
  • Fertilizing
    Use a Blossom Booster fertilizer with every other watering while in bloom. When not in bloom, use 30-10-10 fertilizer every two weeks.
  • Repotting
    Use only a potting mixture designed for orchids. These mixes are made up of different size fir bark pieces, perlite and even charcoal. Repot your orchid when it is nearly overgrown with roots and is not in bloom. This will average about every 2-4 years.
  • Resting Period
    After blooming or producing new growth, most orchid varieties go into a rest period. Reduce the watering slightly and maintain good lighting to allow them to reenergize.

Blooming Orchids

Each type of orchid requires different conditions to bloom (example: Phalenopsis need 6 weeks of cold nights). When you achieve that delicate balance and your orchid bursts forth with a delicate bloom, make sure you do not change your cultural practices or the plant will abort the buds. Even a small change in humidity, temperature or light can cause the plant to abort its bloom, but when you keep the conditions stable, you’ll enjoy the reward these exotic flowers offer.

caring-orchid-1

caring-orchid-2

caring-orchid-3