Monthly Archives: March 2025

Aphids

One of the most common insects, and one of the most potentially plant-threatening, is the aphid. There are actually many types of aphids – more than 4,000 in all. Some feed on specific plants and others are not so choosy. They all attack the newer plant growth and suck sap from a plant’s internal circulation system, the phloem, in stems and leaves. This can decrease the plant’s growth rate, discolor or disfigure leaves, cause galls to form and transmit plant diseases. Strong aphid infestations can lower produce yields and eventually kill plants altogether.

Recognizing Aphids

Aphids – also called plant lice, blackflies and greenflies – are easy to recognize. They’re about one-eighth to one-third of an inch long, usually pale green but can be almost colorless, pink, black or brown. Their pear-shaped bodies have six legs, small tail-like structures and long, jointed antennae. Aphids are soft-bodied and are mainly found in dense groups on the underside of new plant growth, where they leave behind a sticky residue called honeydew. Ants are attracted to aphid honeydew, so a nearby ant infestation or very active ant colonies may also indicate that aphids are present. Aphids are most common in spring, and die off rapidly in the hot temperatures of summer.

Controlling Aphids

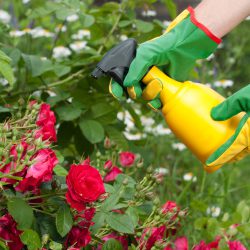
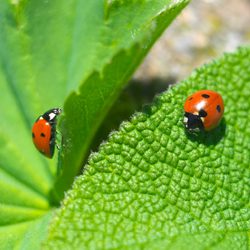
Fortunately, controlling aphids is fairly easy. Most full-spectrum chemical insecticides kill aphids. Other, less strenuous products include plant extracts, neem oil, plant oils and insecticidal soap water sprays. A regular spraying with strong blasts of water or hand picking will control many infestations, especially when just a few aphids have been noticed. Many gardeners release ladybugs (lady beetles) to eat the aphids or parasitic wasps to lay their eggs in the aphid, but because these natural predators will quickly spread out, large applications of hundreds of predators may be needed to effectively control an aphid infestation. Another option is to encourage insect-eating birds to visit the yard – chickadees, titmice and warblers all especially love aphids and can provide superior natural pest control. Even hummingbirds will happily munch on aphids.

It’s best to control aphids early. As their numbers increase, the drying leaves begin to roll over them, thus protecting the aphids from controls such as soaps, oil and water sprays, and making it harder to effectively eliminate these pests. If you think you have aphids or you’re not sure what you have, bring in a sample. We’ll take a look and suggest the best way to eliminate the problem and help you protect your plants.

aphids_3

aphids_1

aphids_2

Lilacs

One of the most popular deciduous flowering shrubs, and certainly one of the most nostalgic, lilacs herald the arrival of spring. When we reminisce about this old-fashioned favorite we recall large panicles of sweetly scented, pale purple blossoms. Today, however, lilacs are available in an incredible variety of sizes, growth habits, flowering times, bloom sizes, shapes, colors and fragrances.

About Lilacs

Lilacs belong to the genus Syringa that consists of approximately 20 different species and about 1,000 different varieties. Most species are native to Asia, but Syringa vulgaris, the common lilac, is an Eastern European native. Some of the finest cultivars of this species were bred in France in the early twentieth century, hence the term “French Hybrid.” Lilacs were cultivated in America’s first botanical gardens and grown by both George Washington and Thomas Jefferson. They remain a steadfast favorite to this day in public gardens as well as backyards, and many municipalities even host lilac festivals to celebrate these blooms each spring.

Proper Lilac Care

If cared for properly, a lilac bush has the potential to survive for hundreds of years. Planting your lilac in pH neutral, well-drained soil that is high in organic matter will help ensure the longevity of your shrub. Providing at least 6 hours of direct sun each day and deadheading immediately after flowering will guarantee an abundance of lovely scented blooms. Give lilacs adequate growing space so that they may grow to their full potential. Spacing these plants too closely will cause them to grow tall and spindly and only flower at the top; instead, be sure they have plenty of room to grow out as well as up and you’ll be rewarded with copious blooms all over the shrub. Fertilize with a high phosphorus fertilizer in the early spring to ensure the best growth and most luxuriant blooms.

When your lilac reaches a height or shape that is no longer to your liking, you may remove up to 1/3 of the thickest stems. Cut them back to the ground. You may also shorten any unusually tall stems by cutting them back to a strong branch. Open up the crowded base of the shrub by removing a portion of the youngest stems. Remember; prune lilacs immediately after flowering before plants start to form next year’s flower buds.

Beyond the Classics

Syringa vulgaris provides the spring garden with perfumed blooms for up to two weeks. To extend the bloom season for up to 6 weeks, plant an assortment of the uncommon species along with the common lilac. Some excellent choices are hyacinthiflora (which blooms before vulgaris), paired with palibin, prestonia and reticulate (which bloom consecutively after vulgaris).

Want to branch out into even more lilac cultivation in your yard? See the chart below, or come in today to see the latest lilacs to love.

lilac_4

lilac_1

lilac_2

lilac_3

Growing in Flower Pouches

How many of us sit on our decks or patios, stare at a bare fence and think, “there must be something I can do with that.”

There certainly is!

“Plant” your fence with flower pouches. Not just for fences, these flower pouches efficiently provide color and/or small veggies for tiny balconies, deck railings or other small areas. Better yet, they’re inexpensive, colorful and easy to plant.

About Flower Pouches

Available in different sizes, shapes and colors, flower pouches are small, heavy plastic bags with holes that are filled with soil and planted. After planting, they hang from hooks on fences, walls, decks, trees… Almost anywhere. Smaller versions may even be snuggled inside baskets or other containers that hang on the fence and conceal the bag.

Planting in Pouches

Many types of flowers, herbs and vegetables can be planted in pouches with great success. Smaller annuals, strawberries or vegetables are perfect for pouches. Petunias, marigolds, alyssum, lettuce and cucumbers grow famously. Plant early cool season flowers in early spring and replace with them with heat-loving annuals in the summer when they peter out.

It’s easy to plant a flower pouch, especially when inserting smaller plants, seedlings or starts. Use a lightweight soil-less potting mixture. You may either completely fill the bag with the soil and then poke the roots of the plant into the holes or you can fill to the first set of holes, plant the starts, fill to the next level, and so on. Unless you are planting very small starts, most people find the “fill to the next level and plant” system works the best so delicate roots are not damaged. Many gardeners skip planting the lowest slots to provide more root space. Others skip the top slots in order to plant on top of the pouch, but you may experiment, of course.

Tip: when planting the starts through the slots, use a dibble stick or dowel to create a downward sloping hole for the roots. This slant stabilizes the plant sooner as its roots grow and expand.

flowerpouch3flowerpouch1

flowerpouch2

Azaleas – An American Favorite

Azaleas are true garden favorite and are popular in all types of landscape designs. To keep them blooming prolifically and as beautiful as they can be, however, you will need to follow a few special directions for their best care.

Planting Azaleas

Azaleas need a well-drained location, as they will not thrive in an area that stays overly wet. They prefer afternoon shade, and too much sun can harm their leaves and fade the flowers, depleting their beauty. For their best growth, it is important to shelter azaleas from drying winds. The best locations in the landscape will be along the north, northeast or east side of a building or stand of evergreens or in the filtered shade under tall trees.

Azaleas may be planted any time of the year, even when in full bloom. Spring and early fall are ideal planting times so the plants are not stressed by the heaviest summer heat. Before planting, loosen the matted roots with a hand cultivator so they can spread and establish more easily.

To give azaleas the excellent drainage they require, they should be planted high, with half the root ball above the existing ground level in a hole at least twice as wide as the root ball. Amend the planting soil to provide good nutrition for these hungry plants. Once the plant is set in the planting hole, fill in around it with the planting mix, packing firmly to eliminate air pockets. Mound soil up to top of root ball. Water shrubs thoroughly with a diluted plant starter fertilizer to encourage root growth and help them establish more quickly. Mulch 2-3 inches deep over the planting hole, with mulch pulled away from plant stem to avoid insect infestations and rotting.

Watering Azaleas

Spring and summer plantings should be watered 2-3 times per week until fall the year they are planted, then once a week until Christmas. Plants may need to be watered as often as once a day if they are small or the weather is hot. Always check the soil moisture level before watering. It should be lightly moist several inches down, but if it is drying out more frequent watering may be needed. In following years you will need to water your azaleas about once a week unless there is a good soaking rain. Plants will need more water in hot summers and while in flower to keep their growth and form lush.

The Need for Mulch

Mulching around azaleas is always a good idea, and can help them thrive. A 2-4″ layer of mulch should be maintained at all times over the root area of the plant, but pulled away from the stems. This keeps the soil cool and moist, helps control weeds and protects roots in winter.

Pruning Azaleas

Azaleas rarely need to be pruned. When pruning is required it should be done immediately after blooming, since if you wait to prune until summer you may cut off next year’s blooms and miss an entire flowering season. Azaleas may be sheared, as they will send out new shoots anywhere on a branch, or you may choose hand-pruning to create a neater form.

With a bit of considerate care, azaleas can be a showstopper in your landscape. Stop by today for help choosing the best azaleas and learning all you need to know to keep them gorgeous year after year!

azaleas

Plants for Wet Soil

More water is always good for plants, right? Wrong! When water stands in the soil, air is displaced, which in turn smothers the plant roots. Once the roots are damaged many symptoms appear on leaves and shoots including wilting, marginal and inter-veinal browning of leaves (scorch), poor color and stunted growth. But the excess water isn’t always coming from overwatering, it may be the result of poor draining soil.

Poor drainage is often produced in disturbed sites when heavy clay soil is compacted by construction machinery or other excessive use, such as yards where several children are often playing. Areas cultivated for plantings, such as flowerbed or borders, then collect water running off the compacted ground – this is called the teacup effect. Wet areas may also be the result of swales, drain spout runoff and low areas even when soil percolation is adequate in most of the site but when general moisture levels are routinely high.

To check for a potential drainage problem, dig a hole at least 2 feet deep, fill it with water and note how long the water remains. If it doesn’t drain completely away within 24 hours a severe drainage problem exists.

Fortunately, you can correct drainage problems in different ways. Easy options include…

  • Divert water past plantings using drainage pipes, splash blocks or rain chains.
  • Plant in mounds or raised beds so water will run off and away from the plants.
  • Install drain tiles in saturated areas or use French drains to contain excess water.
  • Amend the soil with organic matter such as compost to improve its structure.

An even easier solution is to simply select plants that tolerate wet sites. The following trees and shrubs tolerate wet sites and flooding better than most. Few tolerate standing water for long periods (those that grow in truly swampy conditions are marked *), but all will do better in wet areas.

Shade Trees

  • *Acer rubrum/Red Maple
  • *Betula nigra/River Birch
  • Liquidambar styraciflua/Sweet Gum
  • Alyssa sylvatica/Sour Gum
  • Platanus occidentalis/Sycamore
  • Quercus phellos/Willow Oak
  • *Salix spp./Willow
  • *Taxodium distichum/Bald Cypress

Flowering Trees

  • Amelanchier Canadensis/Serviceberry
  • Magnolia virginiana/Sweetbay Magnolia

Evergreen Trees

  • Calocedrus decurrens/Incense Cedar
  • Ilex opaca/American Holly
  • Thuja occidentalis/Pyramidal Arborvitae

Deciduous Shrubs

  • *Aronia arbutifolia/Chokeberry
  • Clethra alnifolia/Summersweet
  • *Cornus spp./Twig Dogwoods
  • Enkianthus campanulatus/Enkianthus
  • Ilex verticillata/Winterberry
  • *ltea virginica/Virginia Sweetspire
  • Lindera benzoin/Spicebush
  • Myrica pennsylvanica/Bayberry
  • *Rhododendron viscosum/Swamp Azalea
  • *Salix spp./Pussy Willow
  • Viburnum spp./Viburnums

Evergreen Shrubs

  • *Andromeda polifolia/Bog Rosemary
  • *Chamaecyparis thyoides/White Atlantic Cedar
  • *llex glabra/Inkberry
  • Kalmia atifolia/Mountain Laurel
  • Leucothoe spp./Leucothoe

Perennials

  • *Arundo donax/Giant Reed Grass
  • Aster nova-angliae/Asters
  • Astilbe spp./Astilbe
  • Chelone/Turtlehead
  • Cimicifuga racemose/Snakeroot
  • Helenium autumnale/Helen’s Flower
  • Hibiscus moscheutos/Hardy Hisbiscus
  • *Iris kaempferi/Japanese Iris
  • Iris siberica/Siberian Iris
  • *Lobelia cardinalis/Cardinal Flower
  • Lobelia syphilitca/Blue Lobelia
  • Monarda didyma/Bee Balm
  • Myosotis scorpiodes/Forget-me-nots
  • Tiarella cordifolia/Foam Flower
  • Trollius europaeus/Globe Flowers
  • Viola spp./Violets

Ground Covers

  • Gallium odoratum/Sweet Woodruff
  • Gaultheria procumbers/Wintergreen
  • Hosta spp./Hosta
  • Mentha spp./Mint
  • Parthenocissus quinquifolia/Virginia Creeper

Annuals

  • Cleome hosslerana/Spider Flower
  • Myosotis sylvatica/Forget-me-nots
  • Torenia fournien/Wishbone Flower
  • Viola wittrockiana/Pansies

Not sure which water-loving plants to choose? We’d be happy to help you evaluate your landscape moisture and other conditions to help you choose the very best plants for your yard!

Two feet wearing rain boots standing in the mud

Cool Wave Pansy

Make way for Cool Wave Pansy! New and improved, bigger and brighter, the familiar little monkey-faced pansy is the new garden darling. These flowers are even more versatile and easier than ever, and ideal for so many beautiful landscaping options.

New Pansies

Cool Wave Pansy is a relatively new cultivar that has so much to offer. These flowers are ideal in beds among other plants and shrubs as a colorful vigorous filler, planted en masse as a blooming groundcover or planted to create amazing baskets and container arrangements with 30” of cascading floral beauty. Standing 6-8 inches tall and covered with three times as many blossoms as regular pansies, Cool Wave Pansies have flowers that glow in four new colors.

  • Frost: White with light blue “frost” edging along the petal margins
  • Violet Wing: Front lower petals are white edged with lavender or darker purples, backed with dark burgundy or purple on upper rear petals
  • Yellow: Bright lemony or sunny yellow blooms
  • White: Bright white petals with slight color variations for elegant interest

Growing Tips

Easy to grow, Cool Wave Pansy is much more vigorous than ever. Choose plants with an overall deep green color with plenty of buds for the best results and fastest blooming. Plant in fertile soil where the plant will receive 6 hours of daily sunlight. Use a liquid fertilizer when planting and fertilize every two weeks to maintain vigor and color. Replace with wave petunias in the summer when it becomes too warm for pansies.

Cool Wave Pansy grows well in rain or cold. In fact, it easily overwinters in many areas. This three-season performer may be planted for fall color, overwinter, and then perk up again in early spring providing an early punch of pizzazz. If it becomes too leggy, just cut back the foliage back to 3 inches tall and fertilize. In a couple of weeks, it will be smiling up at you.

When planting in containers, consider the flower and container colors to maximize the visual effect. Interplant with other textures and colors for an eclectic rainbow of vibrance. When planting in fall, add spring blooming bulbs, as they’ll easily grow through the pansies to create a riot of spring color. Spiky grasses provide a tall and contrasting effect to the pansy’s trailing tendrils, especially in larger containers.

With so many stunning options and new colors to embrace, there’s sure to be a Cool Wave Pansy perfect for all your flower planting desires!

pansy_3

pansy_1

Growing Veggies in Containers

Do you dream of a delicious, homegrown harvest but don’t have the land to use? No longer should a shortage of garden space prevent you from growing your own fresh vegetables. As long as you have a sunny location you can have your own mini-farm on your porch, patio, deck, balcony, roof-top or doorstep!

Why Use Containers?

The benefits of growing containerized vegetables go beyond the issue of space. There are plenty of other compelling reasons to plant your veggies in pots, including…

  1. Vegetables are amazingly ornamental and can be just as decorative as any other container plants or flowers.
  2. There are fewer problems with pests such as groundhogs, deer and rabbits and soil borne diseases.
  3. The soil in pots warms up more quickly in the spring allowing for earlier planting and an extended growing season.
  4. Less bending, squatting and kneeling is required for gardeners with limited mobility.

Vegetables can be grown in any vessel that can hold soil, has adequate drainage and is large enough to hold a plant. There are endless options available on the market or you may recycle items that you already have as long as they meet these requirements. Use your imagination – try a wheelbarrow, wine barrel or just a plastic bin, and you’re ready to plant!

Best Vegetables for Containers

While all veggies can be grown in containers, some are better suited than others. Plants that grow particularly large, that sprawl or that must be grown in large numbers to ensure an adequate yield may take more effort and careful site planning with an adequate container. Similarly, vining plants need not be avoided. Trellis these plants up against a wall or fence or allow them to cascade down from a taller pot or a container placed up high like on a stone wall. For smaller selections, a hanging basket or window box may be used. Many sprawling and vining vegetables are now available by seed in dwarf, compact or bush varieties. These are bred specifically for small spaces and containers and are worth seeking out.

Tips for Container Vegetable Gardens

Growing vegetables in containers does take some unique thought and isn’t quite the same as planting in a traditional garden. When planning your delicious container garden, consider…

  • Containers: Size matters when planting in containers. The bigger the container, the more soil it can hold. More soil more and more moisture means less watering. Take note that porous containers like terra cotta dry out more quickly and will therefore require more frequent watering.
  • Soil: When planting, choose a good quality potting mix. Soil from the ground may contain insects or disease or may be too heavy. Add an all-purpose balanced fertilizer at time of planting. It is also good idea to mix water absorbing polymers into the soil. These granules can hold up to 400 times their weight in water and help reduce watering from 30-50 percent.
  • Plants: Some of the vegetables that you select may be directly seeded into your container; these would include peas, beans, radishes and corn. With most vegetables you may wish to transplant seedlings into your container, either home-grown or garden center purchased. You will generally find a wider selection of vegetable varieties and unique options available in seed as opposed to purchased seedlings, if you want to use your containers experimentally.
  • Supports: Supports should be placed at time of planting for large or vining plants. This will ensure the young plants are not disturbed or damaged with supports added at a later time. If the supports are outside the container, however, they can be added only when they are needed.
  • Location: Your vegetables will require at least 6 hours of direct sun a day. If this is not possible you may try placing your pots on dollies or carts and moving them to a sunnier location as the sun moves throughout the day. Note that good air circulation is important for disease control.
  • Watering: Test soil frequently for water to make sure that you keep it evenly moist. Water the soil, not the plants, to avoid the spread of disease. Check soil moisture more frequently during the summer months when evaporation is faster. Mulching your containers with salt hay or grass clippings will help keep soil cool during the summer months and reduce the frequency of watering. If possible, a drip system can be a great option for keeping containers watered.
  • Fertilization: Fertilizer leaches through pots quickly. Fertilize containerized vegetables at least once a week with a water soluble fertilizer. Always be careful to follow the directions on the fertilizer package and follow the recommended rate. Too much fertilizer may burn or kill your plants, but too little will result in undernourished, underperforming plants.

With appropriate care that caters to the needs of containers, your small-scale vegetable garden can be just as lush and productive as any larger, more intensive space, and you’ll soon have a bountiful harvest to enjoy.

Tremendous Turf

The benefits of turf grass as a ground cover are numerous and often undeclared or overlooked. In recent years, turf has gotten a bad reputation due to the belief that a beautiful lawn requires a lot of hard work and overuse of dangerous chemicals. This is a misconception and the benefits of turf can far outweigh the concerns, particularly when you care for your turf properly and responsibly.

The following is a list of the many advantages that our lawns provide. This list was provided by and may be found, along with other helpful turf information, at www.TheLawnInstitute.org.

Environmental Benefits

  • Cools the Air
  • Produces Oxygen
  • Filters Air & Reduces Pollution
  • Captures & Suppresses Dust
  • Recharges & Filters Groundwater Supply
  • Reduces Storm Water Runoff
  • Controls Soil Erosion
  • Retains and Sequesters Carbon
  • Assists Decomposition of Pollutants
  • Restores Soil Quality

Community & Human Health Benefits

  • Enhances Community Pride & Social Harmony
  • Offers a Natural Playing Surface for Recreation
  • Provides a Safe Surface & Reduces Injuries
  • Promotes Outdoor Activity & Exercise
  • Improves Physical & Mental Health
  • Relieves Stress
  • Lowers Allergy-Related Problems
  • Dissipates Heat & Cools the Environment
  • Reduces Glare
  • Diminishes Noise Pollution
  • Minimizes Nuisance Pests
  • Compliments Overall Landscaping
  • Preserves Natural Wildlife Habitat

Economic Benefits

  • Increases Property Values
  • Reduces Home Cooling Costs
  • Provides a Low-Cost Ground Cover
  • Serves as a Fire Barrier
  • Improves Visibility & Deters Crime
  • Boosts Human Productivity

With so many benefits to healthy, luxurious turf, won’t you give your lawn another chance? We can help – from suggestions for revitalizing a weak lawn to proper mowing tips to fighting weeds and pests, plus all the tools, seed, fertilizers and amendments you need to improve your lawn – our experts can help you make the most of every square inch of your turf!

Pruning Evergreens

When choosing an evergreen for your landscape project, it is always best to select a plant that will not outgrow its designated space, crowding out nearby plants or distorting its own shape without enough room to shine. Proper research can help you choose – you should know the ultimate height, width and growth rate of your selection before committing to what may be one of the more costly additions to your landscape. Always choose naturally slow-growing or dwarf conifers for small spaces, bearing in mind how nearby plants and structures may limit available space over time. Fortunately, just about every genus of evergreen is available in a dwarf variety.

That being said, what if the mistake has already been made? We’ve all made it! It is easy to fall in love with a sweet little plant in the garden center that, within a few years in the ground, looks like it could swallow your house. Fear not, there are ways to rectify the situation with proper pruning.

You will need the right tools to accomplish the job:

  • Loppers
  • Bypass pruners
  • Safety goggles
  • Leather gloves

Pruning should begin in the early spring before the plant’s soft new growth hardens off. Take a close look at your evergreen to determine its branching habit. Pine, spruce and fir trees all have layers of branches that are whorled around the trunk. Arborvitae, juniper, yew and false cypress have limbs that are produced randomly along the trunk.

Conifers with a random branching habit are able to grow new limbs from old, foliage-bearing wood. You may prune this type of evergreen back to this older wood to encourage a more compactly branched habit and keep size down, or to create the desired shape. Whorled branching evergreens are pruned differently, however. They have new growth called “candles” at the tip of their branches, and they really do look like candles with lighter coloration. To promote a more densely branched, compact habit, pinch the candles back by up to half their length before the needles harden off. Never cut into the older wood below the candle, as this type of evergreen does not have dormant buds on the stem that will become new growth. Pruning into old wood will leave a hole in your plant and distort its overall appearance.

As always, we are eager to assist you with selecting the proper plant for any landscape project you undertake and to advise you on proper pruning to keep it healthy and beautiful for many years.

prune2Pine with Cones natural backgroundprune1